Tuesday, March 31, 2009

Homemade Laundry Detergent....It Works, It Really Does

Tired of paying $10.00 for a gallon of Tide? Or even $7.00 for the cheapo brand? Here's a secret: the ingredients that make your laundry cost about $4.00 for a year and a half supply. The binding agent costs $3.00. The rest of it is tap water and advertising.

You only need three ingredients:

Borax

Washing Soda (NOT baking soda)

3 Bars of Fel Naptha Soap (or Octagon) We find both at Krogers.

These supplies will allow you to make 15 gallons of soap (at 3 different intervals, which should last you approximately a year and a half, depending on size of your family)

Physical equipment you need:

5 gallon bucket with lid (we call them pickle buckets and we had plenty, but without lids, so I purchased a new one at Lowe's for $4.99. I recommend the one with the cushioned handle.)

Measuring cup

Stirring spoon (I bought a long handle wooden one that sits right on top of my laundry bucket)

Grater

Medium size sauce pan


Measure 2 cups of borax into the pickle bucket.
Measure 2 cups of washing soda into the pickle bucket.


Peel the paper back on one bar of soap, and grate the soap. The smaller you grate it, the quicker it will melt.
(All tools can be cleaned up with hot water.)


When you're finished grating, the soap looks for all the world like shredded cheese.

Put the grated soap into the saucepan, cover with hot water and stir while over medium heat.


*DO NOT* walk off and leave this - it will boil over.


The soap will melt into a smooth yellow soup in approximately 5 minutes.

Pour the hot soup into the bucket, adding it to the washing soda and borax. Stir.

Add hot tap water (approx 3.5 to 4 gallons, or to within 4" of the top of the bucket), stirring as you add the water.


That's it.

You're done.

Until it cools, it will be a smooth yellow liquid. After it cools, it will be a thicker yellow gel. I keep the wooden spoon on top of the bucket to give it an occasional stir. Even in our unheated laundry room, in the middle of January, it stays a creamy gel.

For each load of laundry, I use a cap from an older store-bought jug and use the same amount of homemade that I used of the store-bought.

This bucket above (minus 1 gallon I shared with a friend) lasted our family from July 2008 to yesterday (3-30-09). We average 4-5 loads of laundry a week.

The first time I made detergent it took me about an hour - this morning it took me about 25 minutes.

The total cost for the last batch, today's batch, and the next batch was $15.00. This includes the plastic bucket, measuring cup, wooden spoon (all reusable) plus the ingredients. The actual ingredients cost $7.00 - and that's 3 separate batches, lasting our family a year and a half.

(The washing soda and borax come in one size (approx 6 cups in each one), so I found it easier to go ahead and buy enough soap to match the soda and borax. I just stored them until it was time to make the next batch.)

If you want lavender scented detergent (or vanilla, or whatever), you can add essential oil to the mixture. I don't because I have asthma, and prefer unscented. The Fels-Naptha soap has a light, clean scent to it but it doesn't bother me in the least.

BTW- this is low-foaming. If you prefer lots of suds, you may not like this detergent. But you should also know that the "sudsing" is artificially added to commercial detergents, and has nothing to do with actual cleansing. Americans have been trained by Madison Avenue to think "suds" equals "cleaning".

Let's see, what else can we make for ourselves?

Monday, March 30, 2009

Quick Cold Frames


This time of year, it's so hard to resist the early seedlings at the hardware store. It will be at least a month until I can set out tomatoes (even in southern Virginia), without having to constantly cover and uncover them. Even the broccoli and spinach still need a little protection at night.

BUT - if you don't have a greenhouse, you can build a quick, inexpensive cold frame - the kind that keeps on giving.

All you need is at least 6 bales of straw (last time I checked Lowe's sold these for $4.29 a bale). (You can do it with 4, but very few plants will fit inside.) Add either a plastic tarp, or better yet 2 old windows, and you're set.

Arrange the bales (I used 6) in a rectangular pattern - 1 bale on each end, and 2 bales on each side. Turn them so they form a closed rectangle. (The photo shows a U-shape, with plants set in, just waiting for the end bale to close it up).

If you are using an old window,(or two), make sure the bales are close enough so the windows sit comfortably across the top. What you've just built is a miniature hot house - a straw box with a glass top.(I found 2 large glass patio doors on Freecycle for my cold frame.)

If you use a plastic tarp instead of windows, lay it across and weight it down with bricks/rocks/cinder blocks.

This bare-minimum cold frame will protect even your smallest seedlings until it's planting time.

When the temperature rises enough to plant, take the windows/tarp off for a couple days, and let the seedlings harden off to the open air.

The basic idea can be expanded on with a "flooring" of compost or dried manure, with the plants set in trays directly on top. The heat from the compost and manure will add extra heat even on the coldest days.

The cold frame size is limited only by the number of available windows, or the size of the tarp available.

After all your seedlings are planted, the bales can be re-used as planters (try planting tomatoes or potatoes directly into the straw bales if you're short on ground space -hollow out a little pocket, add your seedling and dirt, and water regularly), or they can be broken down and spread on the garden as a mulch that really holds the moisture in.

Friday, March 27, 2009

EARTH HOUR IS TOMORROW NIGHT (3-28-09)

Here's Chewy's first re-run, originally posted on 2-18-09, and just in time to remind you about Earth Hour! (Hey, we even re-cycle blog posts here)


Because millions of people globally will be sitting in the dark, or at least,in the non-electric dark, just to bring attention to the earth's dwindling resources, and how we waste them daily, by the hour. Watch this video and consider joining them -it's a Saturday night, there's nothing good on from 8:30-9:30 pm,and you homeschoolers can make a unit study out of it.


Wednesday, March 25, 2009

Eat This, Not That. Or That. Not That Either.


I have an eternally vague goal in my mind of trying to eat healthier food.

Previously this was entangled with an equally vague goal of "losing some weight", but I've long since trashed that idea (not because I achieved it, mind you).

But I do enjoy feeling as if whatever I'm eating might possibly, just in some tiny little way, be something that is not pre-destined to show up on some future CAT scan, as an extra-limb-growing, cancer-causing additive.

So I bought this book. Yet another book. Perhaps we'd all be healthier if we just ate the books instead of the food.

See we are not a particularily "healthy" family. We love meat, we eat fast food, we drink pop, we have no qualms about microwave popcorn or Red Dye #40. We don't count calories, wouldn't know a carb if it bit us, and can barely identify bacon as protein.

Oddly enough, we are rarely sick, and that includes sniffles to cancer.

What I'm after is more energy, and not the kind that comes out of a can (daughter swears by energy drinks - they make me gag).

Now, I should mention that I tend to live on five or six hours of sleep (not necessarily when everyone else is sleeping), and pretty much have one meal, then spend the rest of the day grazing (many times on sour gummy worms).


So I bought this book. Mostly because of it's simple presentation: if you going to eat garbage, eat the garbage that's better for you. Also because of the color pictures and big arrows.


I can do this.


Instead of Haagen Daz, I need to switch to Breyers All Natural.


Instead of Mission Guacamole, I can switch to Wholly Guacamole.


I can drop macadamia nuts and switch to pecans and pistachios (turns out pistachios are the perfect nut).


Watch out for HFCS -high fructose corn syrup- if it's listed in the top 2-3 ingredients, you may as well eat lard. And "they" add this stuff to everything.


Some vegetables are much better than others (remember this when planting your gardens): romaine lettuce is the cancer-killing Holy Grail, bok choy is one big leafy multi-vitamin, and blueberries have more anti-oxidants than any other fruit (especially the wild ones).


In some cases, frozen is better than fresh. Unless locally grown, fresh produce is picked early so it can make that long road trip to your grocer, meaning it had less time in the sun to develop all the vitamins it normally has. Locally grown or frozen produce is picked when it's ripe, making it as much as 50% more vitamin-loaded


Easy stuff, for people like me who don't want to spend a lot of time pouring over minutia and endlessly debating diets. There are several versions, this one is the Supermarket Survival version -haven't had a chance to check out the others. It's over on the bookshelf, and I noticed Walmart carries it and I'm sure your local indie bookstore too. Maybe you could request it at the library.


How could I not like a book that tells me gummy worms and guacamole are great snacks?

Monday, March 23, 2009

The Big Dig

Last summer, our county ran really short of water, to the point of water rationing in our town. I actually had to call the Town Hall and get on the list of "people who have rain barrels" so I could have our fountains running and my gardens watered (otherwise, nosey people report you and then you have Officer Friendly showing up).

But even with 9 rain barrels (slightly less than 500 gallons of storage), eventually the water runs out.

That's when I came up with a brilliant idea for expansion. We're putting in a small sump pump ($35) that will sit in the lowest water barrel and pump water up a slight hill into a small holding pond. All of my gardens downhill from the holding pond, so we'll run a second water line that will allow the water to run down into the underground soaker hoses running through the garden.

Water plants will help filter the rain water (not as clean as you might think) before it reaches the garden, while the neighborhood bunnies and possums can also use it as a watering hole.


The photos above are the pond site, and the gardens below the site.

This is the pond form itself, approximately 2.5 feet deep, maybe 4 feet long overall.


And then there's the two of us, waiting for the hole to dig itself.


It didn't. So we are forced to dig. Digging is my least favorite thing in the world. I may prefer root canals to digging.


After several buckets of dirt (not many - we are wimps), we decide to compromise -instead of digging it completely out, we will dig it halfway, and pull the dirt up around it. Yes, we are lazy.


The next step is to set the form into the hole, and work at getting it level. I *think* the correct way to do this is to overdig the hole, put sand in the bottom and then work the form into the sand. We of course did it differently.


Last step was to use a level, and even out the form in the hole.


The next step was to call it a day, and go sit down with some tea.


After we recouperate, we'll be drilling holes for the hose connections, and digging trenches for the piping to and from the form.

I'm thinking we can rent one of those digger things for that.


Saturday, March 21, 2009

What Is This Victory Garden You Speak Of?


The First Lady is planting vegetable gardens on the White House lawn. Just like another First Lady in 1943 inspired 20 million Americans to plant a Victory Garden as part of the war effort, this garden is hoping to inspire people to get back to healthy foods.


Nowadays our war is against obesity and contaminated food sold to us by corporations. But I also think we are fighting a culture of ignorance, in that we eat millions of pounds of food every year, with no appreciation of where it came from or what it costs to produce it, either in effort or environmental terms.

Like the poster says: YOU CAN MAKE THIS KIND OF AMMUNITION! Plant a garden with your child, let them work up a sweat turning over the soil, make sure they are the one to drop the seed in and cover it up, remind them to water, and then watch the look on their faces when they actually pick that first ear of corn, or perfectly red tomato. See if they don't want to try sugar snap peas off the vine, or sit in the middle of the strawberries and stuff their faces full.

Besides teaching your child that time and effort go into producing food, you'll save a ton of money on your groceries, and you won't have to worry that someone has sold you food full of salmonella.


Find a nearby cannery, or teach yourself how to can or freeze your extra produce. Voila! Now you have a safe food supply for this winter, and it's already paid for.

The Obama's have a huge front lawn, but it's not necessary: you can produce enough fresh food for a family of four out of container gardens. They can sit on your apartment balcony, on your roof, to one side of your driveway, or inside your livingroom by that big picture window.

There's really no reason not to grow a modern-day Victory Garden -and there is nothing in the world better than that first ripe tomato off the vine!

Friday, March 20, 2009

Little Green Houses For You and Me

Why it would possess me to build a greenhouse in the spring I have no idea. There is little to nothing you can do with a greenhouse in the late spring to late summer. And in Virginia, there's not much you can do with one in early fall either.

But come late October, it's a wonderful place to move my plants into, and try to stretch out those last few weeks of fresh tomatos or green peppers. And come February, it's perfect for watching new seedlings come up, or stashing those plants I bought on a whim that are months away from being able to survive outdoors.

After years of dreaming of having my own greenhouse, we finally decided to make an economy version. Of course, the one in my vision was a proper English greenhouse complete with metal Victorian finials on the peaks. Preferably with my own castle in the background.

Since that's not likely to happen anytime soon, I researched hoop greenhouses on the net.


Using an existing raised bed, we took 10' lengths of 1" PVC, connected 2 lengths and bent it so that it spanned the 12' garden bed, attaching each end with U-shaped clamps.

The idea was that plastic could be laid over the hoops, and anchored on either end with soil. The door would be double-layer plastic on one end.

This was one of many plans I found on the net - there are other variations, including one with the plastic anchored on the interior with 40 lb bags of potting soil, which are then cut open and used directly for planting. Liked that one too.

This idea did not work for us, for several reasons. The construction works very efficiently at trapping heat - too efficiently. By the time we had finished stretching the plastic, the temperature inside was over 120 degrees. And there was no way to vent it. Hmmm.

After trying to work out a venting system (without much luck), we discovered this sort of greenhouse is not suitable when you live just beneath a ridge that funnels the wind down across your yard. The entire greenhouse was flat within days, and the plastic shredded. Back to the drawing board.


Our next plan was to mix the "hoop" idea with a solid wooden half frame, adding a recycled joulousie-window on one end and a screen door on the other end for venting.


Better. But the hoops continued to shift and bend whenever there was a slight breeze, even though they now had a center ridgeline pole to help them hold their shape. Plus there was no way to hang plants. So, we decided to re-design yet again (at this point it was a matter of stubbornness more than anything else).

The last design involved separate plastic panels with wood frames (if one panel has a cut or failure, only that panel has to be replaced), and additional hanging bars on the inside. Also, a wooden frame is added to the ceiling, plus the bottom half is enclosed with wood.


And finally, it's done. The little vents on each side of the door were recycled metal heating vents that open and close as needed. The screen door has a plastic sheath that is used in the winter (although we've since decided to purchase a second screen door, and just exchange out the door versus putting plastic on and off -it's easier on the door frame). The dark green base helps collect heat and warm the interior in the winter (and it does a pretty darn good job in July too), plus it's my favorite color.

The plastic I used is from:
http://www.northerngreenhouse.com/ordering/index.htm
and it is the most wonderful product I have ever used - it does not split, yellow, tear or breakdown under the hot Virginia sun. Save yourself major headaches and do not attempt to use the roll plastic commonly found at the local home improvement store - even the heaviest mil they sell is not strong enough for greenhouse use. We've used this North Dakota plastic for 2 years now, without any problems at all. Ask for Bob -he's a great guy.


Because we took the long way around, the greenhouse cost us almost $1000. However, I console myself knowing a comparable kit for a 12'x12' greenhouse is approximately $3800.00.


If we had gone directly to the final design (i.e. had a clue about what we were doing), cost would have been approximately $500 ($100 is for the plastic), and would include wood, hardware, the door and window (found at a Habitat For Humanity store for $15), and Thompson's Sealer for the wood.


What if there's no $$$ for greenhouses? Do you have an existing structure in the yard you can re-use?

This is the leftover frame from my daughter's swing set. At one point we covered it with a large sheet of plastic and used it to set bedding plants in. With a small amount of wood, it could be enlarged, squared off to hold a door, and made into a 10' x5' mini greenhouse. Currently ours has trellis stretched over it for morning glories or gourds to grow on. The base area has topsoil and organic material added for peas and beans. Come July, the morning glories and gourds will stretch out the growing time for peas.


Another idea - for that old shed - is to remove the roof, stabilize the interior, and cover the top with the fiberglass panels available at Lowe's - 12' long by 2' wide, for approximately $28 per section. To increase the amount of light, use a Sawz-all and cut one side of the shed down a couple feet, then install your roof panels - and make sure the slope faces the direction of the strongest amount of daily sunlight. Use inexpensive caulking to seal the shed. Something this simple will provide a warm enough sheltered spot to start seedlings or protect a few plants in the fall.


For more ideas, check out Building Your Own Greenhouse by Mark Freeman (over on the bookshelf, and yes, it's available used.)


Of course you could always just put in a simple cold-frame, but that's another post.


Thursday, March 19, 2009

Starting Your Own Killer Tomatoes

It's that time of year - specifically 6-8 weeks ahead of the last frost (usually around the second week of May).

There are two choices when planting a garden: either buy your plants ready-to-plant from the store, or start your own seeds. Frankly, I find I do better with store-bought plants. They seem stronger, hardier, and the bigger the plant you buy, the further ahead you are in the game.

But since I whined for years about having a greenhouse, now I feel like I should try to get my money's worth out of it. Not that just being able to go out in the middle of January, and sit in the 95 degree heat isn't worth every penny, but this year I thought I'd try starting my own seeds.

Turns out it's not rocket science but there are a few considerations you need to pay attention to, such as moisture, warmth, and a little boost of fertilizer after the plants are established.

First - pick reputable seeds. This is not the time to be planting the ones you found in the back of the kitchen junk drawer, packaged for 2006. At least not if you expect them to come up. These happen to be Burpee, mostly because I was in Target in January, and the seed display sucked me in. I remember thinking if I was buying seeds, it couldn't be that long till spring.

Read the back of the package -it has all the info you need: how soon to plant, how deep to plant, how far apart to plant (in case they are going directly into the ground -and tomatoes shouldn't be this time of year).


You can start your seeds in the large, multi-section seed flats BUT eventually you'll need to transplant them to larger containers, and then finally out into the garden. That extra step is just additional stress on a young plant, so I save up my larger containers and eliminate that middle transplant step. Eventually these plants will go directly into the garden.


To keep the plants moist and well-watered, set the pots in plastic (ACK...more plastic) pans (think cleaned and sterilized old kitty litter size pans), then fill them with soil. Some gardeners prefer to use special seed-starter medium, but I've never had much luck with that. My choice of dirt is the standard least expensive, 40 lb bag found at Lowe's. I also have no problem using the Miracle Gro soil (yep, I think this makes me non-organic, and I'm okay with that).


Using a pencil, or something of similar size, poke 2-3 holes in the soil, approximately 1/4" deep.
Place one tomato seed in each hole, pull the soil lightly back over the seed.
That's it.
That's exciting as it gets.

All you do to finish up is water lightly (in this case, daughter is pouring water into a used styrofoam cup with holes poked in it to disperse the water) onto the soil/seeds.
Then pour an inch or so of water into the pan itself. The soil will then water itself for a week or so, and save you having to constantly check on moisture levels.


Seeds and seedlings love warm, moist environments to get started. I use cling wrap (More Plastic -I am going to hell for this).

Put a piece over the top of each pot, and secure with a rubber band, making each pot into a mini-greenhouse.

Tomato seedlings come up in 7-10 days, at which point the plastic should be loosened (or poke a couple venting holes)to let the hot air escape.


For today, the only item purchased new was the pack of seeds and the bag of soil (purchased last year with the end of the season markdowns, and stored for use until this spring). The plastic pots are ones that plants came in previously, and they will be re-used until they disintegrate. The plastic pans are recycled kitty litter pans, and the metal trays they sit on were purchased at a garage sale, specifically for sitting soaker plants in. The milk cartons have been saved up for holding water all winter in the greenhouse, and when the young plants go out into the yard, they will be cut down and made into individual protectors.

The styrofoam cups (*EVIL*, I know) are recycled from my dad's -he swears by them to start his seedlings, and no amount of discussion will change his mind- so I keep them and re-use them as much as possible. The ice-cream buckets are re-used for everything from watering, to mixing fertilizer, to filling in for a quick planter, to holding extra water plants through the winter, to those August days when there way too many tomatoes and not enough baskets to carry them inside.

Starting your own seeds can save you a bundle and the garden/greenhouse is the perfect place to recycle and re-use items while trying to be a little more earth-friendly. Or at least "friendlier" -obviously there's a lot of plastic stuff here,but the idea is to re-use what you've already purchased, or at least find what you need at garage sales,etc. versus buying new items.


We'll check back on the seedings in a couple weeks and see how they're doing.
Hopefully it won't freeze again at this late date!

Wednesday, March 18, 2009

We Be Widget-Less

Update on Widget, or on the absence of the Gardening Widget.

I am Widget-impaired. I cannot get the stupid thing to work, and Widgetbox is useless for advice.

So I've dumped the Widget, and will now attempt to be all-things to the gardening world.

I'm thinking that has to be easier than fixing the widget.

Fresh Bulk Spices

When we built the greenhouse a couple years ago ( I say "we" but it was really mostly my husband), one of my goals was to be able to cut down on my startup garden costs every year by growing my plants from seedlings, plus be able to have fresh broccoli and lettuce all winter, as well as growing and drying my own herbs.


Despite on-line accounts of successful solar greenhouses (even in Maine), I have yet to get any crops through our wimpy Virginia winters, with the exception of herbs.


So, in the spirit of concentrating on what you do best, this year's focus will be herbs. My goals are to grow and dry all my own stock, have enough to share with friends, and possibly have a bit left over to sell (this is the long shot).


At this moment, the lavender, sage, rosemary, thyme and basil have made it through the winter. Actually the lavender has been blooming all winter, seemingly oblivious to the whole winter-snow thing.


Meanwhile, I've bought some fresh herbs in bulk, finding that they are much cheaper and many times tastier than the boxed/bottled portions available at most grocery stores.


My source is The Well, in Bedford, Virginia. One of my favorite places, worth the drive if you're anywhere in the area. If not, look for natural or organic food stores. If all else fails, look online. But there's nothing like being able to smell what you're buying.


Yesterday I picked up fresh Italian seasoning (we use this like salt & pepper at our house) for $1.01 per oz., and gumbo file (necessary for Cajun cooking and specifically gumbo) for $0.94 an oz.


Previously I had stocked up on chipotle, fenugreek, celery seed and Chinese Five Spice. Note: No matter how tempting it seems, do *not* stick your nose in the bag of chipotle and savor the smell. It can be overdone. Sniff.


I also found a couple sets of the small half-size Ball Mason jars in the canning aisle at Walmart, $4.97 for a set of four. Each jar holds approximately 3 oz of spice. Using the gravy ladle (which has never been used for gravy), I scooped the fresh spices into the glass jars, sealed and labeled.


They look so pretty, and even with the cost of the jar (avg $1.24, re-usable indefinitely), were less expensive than buying just one small can of spices at the standard grocery store.


Next year some of these will be filled with my homegrown spices. Meanwhile, here's the sage currently coming back to life in the greenhouse (three year old perennial plant, and will grow to 2-3 feet by August. Can be transplanted for winter, and perfect for cuttings and starts):


Wednesday, March 11, 2009

New Gardening Widget Added!

It's down on the lower right - a neat little widget for GardenFingers.com full of all sorts of ideas.

Yes, I know I should aim for MY blog to be the end-all and be-all in gardening blogs, but hey, it isn't, and spring is coming up fast, and the gardeners can use all the help they can get. I'm always looking for better ways to do things, and if I keep looking, someday I will find someone with the secret to getting rid of wiregrass.

(Just to save readers some time: we've tried everything from RoundUp to a flame thrower to actual concrete. It still comes back. So what else ya got?)

Tuesday, March 10, 2009

Calorie Free Lasagna Gardening For People Who HATE to Dig

It's about that time again. Almost spring, and I need to start thinking about how to put in the gardens, whether to enlarge, condense or maintain.

By now the memories of the August Tomato Avalanches have faded (the ones where all my tomato plants came in at once, and I had that glimpse of sanity when I realized I must have been crazy to plant all those tomato plants, and that it's entirely my own fault that I am surrounded by bowls and bowls of tomatos, with no one to palm them off on).

That doesn't ring a bell with you?

Hmm. Okay let me help you reach my state (of insanity). The easy way.

Cause I love my garden, but I HATE digging. Never mind my back can't take it, but we also live on a solid vein of clay.

The solution is lasagna gardening. Love it. Piece of cake. No digging, all organic, and it enrichs the soil, versus tilling, which damages the soil by disturbing it and killing the microbs needed for healthy soil. Plus, lasagna gardening is a huge attraction for earthworms - you can actually get them to do the "tilling" for you. (It's really not that hard, but if you want a book with all the gritty details, try Lasagna Gardening by Patricia Lanza. I set it over on the shelf for you.)

Like I said , our backyard is literally solid red clay - perfectly suited for making pottery or bricks but terrible for gardening. Thanks to lasagna gardening, my earthworms couldn't be happier helping me break it down.

Let's begin.

(The neighbors hate us because we don't mow twice a week, and we don't allow a lawn maintenance company to fertilize our grass, plus we live uphill from them, so their chemicals don't flow into our gardens).

Your first decision will be where to place your new garden, or if you want to enlarge an existing garden. Once you pick a spot, carry out a pile of newspapers, and your water hose. Lay out sections of newspaper, 4-5 sheets thick, right on top of the grass/weeds/dust. Don't use the comics, or the slick magazines or ads - just the black and white newsprint paper.

Use your hose to soak the newspaper. (If you decide to do this on a windy day, it will require at least 2 kids to help -1 to hold down the paper while you wet it, and 1 to lay more paper and/or chase it across the yard, while you run the hose, and laugh at them.) Cardboard can also be substituted for newspaper (did this last year for the blueberry patch).

The next layers are basically a big compost/mulch pile so you want an even mix of alternating layers of brown and green organic matter.

Brown organic matter could include: raked up leaves, pine straw, shredded newspaper, manure, peat, ground up peanut shells -use your imagination and your location for ideas. My husband's a woodworker, so I use large amounts of sawdust (but never from treated wood).

Green organic matter could include: Straw, grass clippings, trimmed plants from the garden, vegetable scraps from the kitchen, coffee grounds, and even seaweed if you live close to a source.

If you've started your garden in the fall, walk away at this point and let the layers settle over the winter. Come spring, you'll just need to push aside a bit of the top material, and set your plants right in. Then continue to add more organic matter as it becomes available.

BUT - if it's spring, add a thin layer (or two) of topsoil between the top couple layers of organic matter. If you don't have a free source, you can get the cheapest sort at Walmart or Lowe's. Your organic matter will supply all the nutrients your plants could ever want.

Then plant.

This is last year's tomato patch before planting, complete with fencing. I've toyed with tomato cages and find them inefficient and irritating. So now I just string fencing in rows, and alternate the tomatoes on either side, while running the soaker hose along the base line. The lasagna layers get pulled up along the fence, and scrap carpeting (turned upside-down) is laid between as pathways. The carpeting will last 3-4 years before being discarded. (Yard sales are a great resource for this, or your backyard neighbor who's decided to replace her carpeting-just offer to haul the torn-out carpet).


Under all those organic layers (and the carpets), the newspapers/cardboard will kill the grass, and slowly decompose. As this happens, the earthworms will come up and slowly break up the soil (YES EVEN CLAY), turning it into a rich dark loamy soil. And then come July, your garden will look just like mine - a mass of green thick healthy plants, in this case potatoes, tomatoes, and mint.

Another plus with lasagna gardening - keep a bale or two of straw around, and use it to top the potato beds in midsummer and again in November. In July-August it will keep the potatoes from sunburning, and in November, it will keep the winter harvest from freezing. Pulling up potatoes grown this way is almost effortless.


I also use my leftover layers to mulch the flower beds. These irises love the pine needles.

And not a moment of digging. It works. Really, I promise.

Thursday, March 5, 2009

You Are SO Plastic

And not in that Seventies way.....

One of my favorite blogs belongs to Carrie over at The Blue Nymph:
(http://www.thebluenymph.blogspot.com/ and while reading over there I came across a link to yet another blog, which for the life of me I cannot seem to find again, but it was from a family who decided to try to eliminate plastics from their lives, or stop buying plastic for a year.

For some reason this has stuck with me, probably because I read GarbageLand by Elizabeth Royte last fall (look over on my Sheltari, the link is there), and last summer read Safe Trip To Eden by David Steinman (also over on the shelf).

Garbage Land is the story of exactly where your trash goes after the big truck picks it up, and its fascinating. When we decide to "de-clutter", we're just de-cluttering our immediate surroundings. It doesn't disappear. It just goes somewhere else.

Safe Trip to Eden starts out with the author wanting to remove all the plastics from his home, since every piece of plastic you come in contact with manages to leech chemicals into your body, and currently we have .... I believe it was 40 parts in the average human....and the safe amount was .00000000000400000 microparts (winging it on the precise figures here, as I am not a mathematician. Anyone that knows me will vouch for this. But the point is, what's safe for us to have in our bodies could fit in one tiny micro-corner of tiny little micro-pinhead. What we have in our bodies takes up the whole box of pins, plus several pincushions).

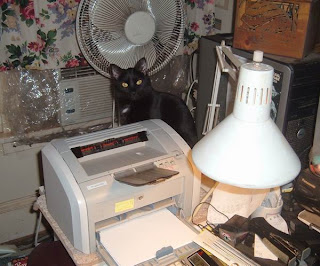
To see just how much plastic there is in our daily lives, here's my desktop as an example (I could tell you it's unusually messy, and will be cleaned up as soon as I finish this posting, but I'd be lying. It is what is. I like it this way.):


Plastics, from left to right, photo above and photo below:

Computer cables, window plastic, air conditioner housing, some fabric content in 1950s barkcloth draperies, fan blades and housing, printer, carpet square printer sits on, computer speakers, cat, no wait, Cat is real, surge strips, stapler, TV, VCR, computer tower, VCR tapes, TV remote, paper clips and paper clip holder, calculator, highlighters, pens, markers, mouse, folders, baskets for organizing, scissor handles, catalogs (coated covers).

That's just in an approximate 3 foot by 3 foot area.

Okay, maybe just THIS area is plastic-intensive.

Let's check out the kitchen. (And I don't want a single comment about my housekeeping, if it bothers you, I'll be happy to pencil you in and you can stop by to spiff it up):

Plastics left to right, photo below:


TV, coatings on the tea boxes, dishwasher, crock pot handles, water pitcher, bottle of detergent,window frame itself, glasses in sink, scrubbies, and let's not forget what's inside the cabinets: plates, bowls, glasses, plastic-coated shelf dividers and plastic liner-stuff for all of it to sit on.

Maybe the other side of the kitchen is better:


Microwave, plateholders, face and front on oven,shelving itself, mixing bowls, water pitcher, mixer-in-box, dog food bin, milk carton ready to be thrown out, and just out of sight on the floor, a plastic step stool next to the plastic trash can, with it's plastic garbage liner (probably full of plastic wrappers).

This is getting depressing. It may be why I gave up on getting plastics out of our lives. That, and reading in Safe Trip to Eden that not only are we exposed to plastics when we touch them (think your kids toys), but when we drink/eat from them, when we use them in the microwave (it releases more chemicals into the food), when we breathe around them (how many hours do I sit in front of this computer or drive in my car with its plastic interior?), or just use products like shampoo or lotion (then we absorb it through our scalps and skin).

Literally almost every object we come in contact with either is plastic or is coated with plastic.

Now, keeping in mind eventually this stuff gets thrown away, and while most of it ends up in landfills somewhere, a bunch of it doesn't. A bunch of it ends up in the ocean. And the ocean currents carry it to a place in the Pacific Ocean, north of Hawaii, where it swirls in a plastic vortex, the size of the continental United States.

Think I'm making this up?

Welcome to the Plastic Soup in the Pacific Ocean:

http://news.cnet.com/8301-11128_3-9959995-54.html

One interesting discovery for the researchers exploring the plastic soup is that the ocean currents and waves eventually return plastic to tiny pellets. The tiny pellets are absorbed into plankton, which are eaten by fish, which are eaten by humans. And as you may have heard: We are what we eat, meaning eventually we literally are plastic.

I greatly admire anyone who can reduce plastic in their lives and figure out how to get along without it.

I just haven't got a clue how to do that.

Our solution for the moment is to plod along, purchase by purchase, literally evaluating everything. Gradually I'm accumulating glass pots and pans to cook in (don't get me started on teflon-it's a plastic as well, and is now linked to cancer), buying veggies that aren't wrapped, using aluminum water bottles, and trying to buy as little plastic as possible.

It's not easy. And it's mindnumbing at times, like trying to swim upstream in a flood. A flood of plastic soup.